If you’re a car enthusiast who’s pushed your stock brakes to the limit—say, after a few track days, or a particularly spirited canyon run where you had to hammer the stop peddle more than once—you’ve probably thought about upgrading to a big brake kit (BBK). As a BBK supplier, I’m here to break down exactly what the installation process looks like, straight from what we’ve seen our customers do successfully (and a few mistakes to avoid, too). No fancy jargon, just the real deal. Big Brake Kit
First off, let’s get one thing straight: this isn’t a 1-hour garage job. If you’re comfortable wrenching on your car—changing oil, swapping tires, maybe even a coilover setup—you can handle a BBK, but you’ll need to set aside a solid 4 to 6 hours, maybe more if it’s your first time. Also, you’ll want to make sure you have the right tools: a 1/2-inch drive ratchet (not the tiny 3/8 one, trust me), a breaker bar for stiff lug nuts, a jack stands (never just a car lift or a hydraulic jack alone), Allen wrenches (most BBK calipers use these, not standard bolts), a brake bleed kit, and of course, the kit we sell (your specific application’s kit, too—important, because BBKs are car-specific; a kit for a Subaru won’t fit a Ford, and vice versa).
Let’s start with pre-install checks. Before you even jack the car up, pop the hood and look at your stock master cylinder. If you’re going from a stock 2-piston caliper to a 4 or 6-piston BBK, you might need a master cylinder upgrade or a proportioning valve adjust. Wait—no, not every time, but if your car feels mushy after install, that’s often the issue. We always include a quick check list with our kits, so make sure you read that first. Also, drain a little brake fluid from the reservoir—you don’t want it spilling all over your paint when you disconnect lines later. Oh, and take photos of your stock setup before you tear anything out. It sounds silly, but when you’re mid-job, forgetting where a bracket went is way too easy.
Now, lift the car. Park on flat ground, engage the parking brake, chock the rear wheels (if you’re working on the front, which most BBKs are for; rear BBKs are a whole other thing). Jack up the front end, set two jack stands under the subframe—never the control arms, that’s a crash waiting to happen. Then remove the front wheels, set them aside. Next, disconnect the brake line from the stock caliper. Use a line wrench, not an open-end one—you’ll strip the bolt, and that’s a nightmare. Once the line is loose, cap it with a plastic cap (we include these in our kits) to keep dirt out. Then, remove the stock caliper: usually two Allen bolts on the back, or sometimes 14mm bolts. Once those are out, the caliper should slide right off the rotor. Then remove the stock rotor—sometimes it’s rusted on, so a rubber malTap it gently, don’t hit it too hard. If it’s still stuck, a little penetrating oil around the hub will help.
Wait a second—here’s a common mistake I see: people skip the hub cleaning step. Your stock rotor sits on the hub, and there’s usually a little rust or built-up gunk there. If you don’t clean that, the new rotor won’t seat flat, which will cause vibration when you brake. Take a wire brush or a sanding block (fine grit, so you don’t damage the hub) and scrub that hub until it’s shiny. Easy, but crucial.
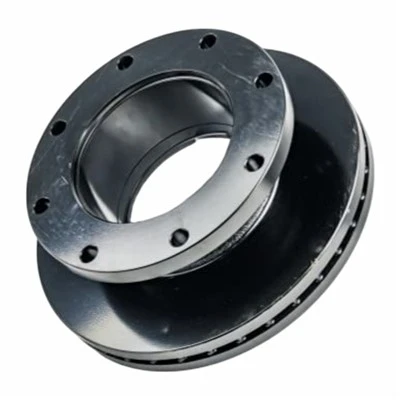
Now, the BBK parts. First, you’ll install the new rotor. Most BBKs use a floating rotor, so it has little pins that let it move a bit. Line the pins up with the holes in the hub, then tighten the rotor’s lug nuts (the ones that hold the rotor to the hub) to the torque spec we give you in the kit. Don’t over-tighten—you’ll warp the rotor. Then, the caliper bracket. This is the part that mounts to your car’s spindle (the part that holds the wheel hub). The bracket is specific to your car, so it’s a direct fit for our kits—no modifying needed, which is a huge plus. Line the bracket up with the holes on the spindle, use the bolts we provide, and tighten them to spec. Most people use a torque wrench here, which is smart—under-tighten, and the bracket moves; over-tighten, and you crack the spindle.
Next, the caliper. Slide it onto the bracket, then tighten the two Allen bolts that hold it. Again, torque spec is key. Now, the brake line. Our kits come with extended brake lines (or hard line adapters) because the BBK caliper sits further out than the stock one. You can’t use your stock line— it’ll be too short, and it will stretch when you turn the wheel, leading to a leak. Connect the new line to the caliper first, then the other end to the hard line under the car. Tighten it snug, but don’t crush the line.
Now, the scary part: bleeding the brakes. This is non-negotiable. If there’s air in the lines, your brakes will feel soft, and they might not stop properly— super dangerous. How to do it? We recommend a 2-person bleed: one person pumps the brake peddle 3 times, holds it down, the other opens the bleed valve on the caliper, lets fluid and air out, then closes the valve before the peddle hits the floor. Do this a few times, starting from the farthest caliper (usually the rear passenger, then rear driver, then front passenger, then front driver). Wait—front is closer to the master cylinder, so you do front last. If you’re alone, you can use a power bleed kit, but make sure you watch the fluid level in the master cylinder the whole time—if it runs dry, you have to start over. Add fresh brake fluid (we recommend DOT 4, unless your kit says DOT 5, but most street kits use DOT 4) as you go, so you never empty the reservoir.
Once you’re done bleeding, double-check every bolt: caliper bracket bolts, caliper bolts, brake line connections. Then, put the front wheel back on, tighten the lug nuts in a star pattern (so the rotor doesn’t warp) to the correct torque. Do the other front side the exact same way. Lower the car, then take it for a test drive—slow, first. Don’t go over 20 mph, and apply the brakes gently a few times to seat the pads and rotors. If you feel any vibration, stop, check the lug nuts, make sure the rotor is seated flat. If it’s still off, you might have warped a rotor, which is why we suggest a test drive at low speeds first.
Wait, let’s talk about pad break-in. Most people forget this. You don’t just install the BBK and go track day. You need to do a break-in: 10 hard stops from 60 mph to 20 mph, letting the brakes cool for 2 minutes between each. That sets the pad material to the rotor, so you get maximum stopping power and no noise. Skip that, and you’ll get squeaking, and the pads won’t wear evenly. A quick tip from us: if you’re installing a track-focused BBK, make sure the caliper is vented? No, wait, the rotors are vented—our BBKs all use high-carbon vented rotors for heat dissipation, which is why they’re better than stock.
Now, some issues we see customers run into: first, fitment. If you buy a universal BBK (we don’t sell those, fyi—universal is a scam), it won’t fit. That’s why all our kits are car-specific, so you don’t have to modify anything. Second, not bleeding the brakes right. We’ve had customers come back saying their brakes felt soft, and it was just a bad bleed. Third, using the wrong tools for the brake line. Line wrenches are a must—open-end wrenches will round off the line nut, and then you have to replace the whole line, which is a pain. Fourth, skipping the hub cleaning. That’s the number one cause of vibration after install.
Now, as a BBK supplier, we always tell our customers: if you’re not sure about any step, get a professional mechanic to do it. It’s not worth risking your safety for a DIY job. But if you’re up for the challenge, take your time, follow the kit instructions, and the steps above, and you’ll have a BBK that stops better, lasts longer, and makes your car look way cooler.
Wait, let’s wrap this up. The key steps again, for quick reference: pre-install checks (master cylinder, brake fluid), lift car safely, remove wheels, disconnect stock caliper, remove stock rotor, clean hub, install new rotor, install caliper bracket, install caliper, connect new brake lines, bleed brakes, install wheels, torque lug nuts, test drive, break in pads. That’s the gist.
If you’re ready to upgrade your car with a BBK—whether it’s for street use, track days, or just better stopping power—reach out to our team to talk about the right kit for your vehicle. We’ve got options for everything from daily drivers to track toys, and we’ll make sure you get all the parts and info you need for a smooth install. Don’t wait until your stock brakes fail mid-drive—upgrade safely, and upgrade right.
Brake Pads References:
- SAE International. (2019). Brake System Installation Guidelines for Performance Vehicles.
- automotive_aftermarket_association. (2021). DIY Brake Upgrade Best Practices.
- Brake Technology Journal. (2020). Floating Rotor and Multi-Piston Caliper Fitment Standards.
Dongying Hongta Automobile Fitting Co., Ltd.
We’re known as one of the most professional big brake kit manufacturers and suppliers in China, also support customized service. Please feel free to wholesale durable big brake kit for sale here from our factory. For price consultation, contact us.
Address: No. 817 Bingsheng Road, Guangrao Economic Development Zone, Guangrao County, Dongying City, Shandong Province
E-mail: Amanda_song@hongtabrakes.com
WebSite: https://www.hongta-brake.com/
